Mobile App Prototypes Using Sketch And Framer
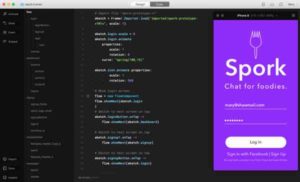
Recently I’ve been experimenting with Framer, a prototyping tool that plays beautifully with Sketch. The two apps are a powerhouse duo for mobile app design. In this post I’ll take you through the steps I took to build a prototype of “Spork”, a fictitious iPhone app for foodies.
While Sketch just announced its own prototyping capabilities and the latest version of Framer supports screen designs, I think the two apps are better together. Each offers unique features that speed up your overall design workflow.
Project Goal
Mobile app prototypes are a great way to vet project ideas early on before investing a ton of time and money into design and development. They help prevent scope creep and encourage design teams to intentionally think through the purpose and mechanics of an application. Above all, prototypes help teams build the right thing for the right reasons.
This was purely a personal project to learn how to create mobile app prototypes using Sketch and Framer. I also wanted to create an MVP (minimum viable product) that I could share with others.
And although I wanted to work as quickly as possible, there were no hard deadlines. It was just plain fun :)
Who Are You Designing For? What Do They Get?
Before designing anything I had to first decide who the app was for and what benefit it provided.
As I imagined the potential audience for my app, I pictured passionate foodies exchanging recipe ideas within a closed social network. I have a friend who is a professional chef, so Chef Jon became my main persona.
User Flows and Initial Sketches
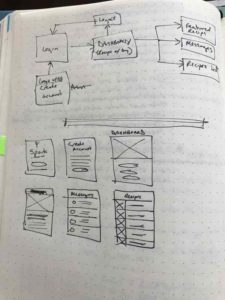
With the ideal user in mind, I began sketching out the initial user flow. Users would need a sign in screen, a dashboard, and a recipes list. But what about recipe details and messaging? What key screens were required for the MVP prototype? What screens could wait until later?
Sketching always helps me “think on paper” first without the distractions of software getting in the way. Having a quick visual reference also helps me reflect on and think through a design problem more effectively than I might otherwise. Then, once I’m ready to start designing everything moves faster.
Designing Screens In Sketch

My initial sketches gave me a pretty good idea of what was needed so I skipped wireframing entirely and went right into Sketch. I used my hand-drawn sketches as a roadmap instead.
Whether you use sketches, a whiteboard, or high-fidelity wireframes, what’s most important is to have a plan before you dive in. Planning ahead gives you the confidence to get started and will shave hours off your total time investment.
(By the way, if you want to get better at using Sketch, be sure to check out an online course I took that helped me land a 6-month UX/UI retainer client for my freelance business. The link above is an affiliate link, which means I’ll earn a commission at no additional cost to you if you do purchase the course. If you have any questions please let me know and I’ll be happy to answer them.)
Learning Framer
Next came the hard part. Learning Framer means learning how to code. Not a lot, but definitely enough to be dangerous. Framer uses a language called “Coffeescript” which compiles everything into Javascript. This means finished Framer files are basically little websites that an be viewed from anywhere.
If you’ve ever programmed in Javascript, Coffeescript should look very familiar. If you haven’t, don’t be scared. It’s very forgiving!
I found some very useful resources to get better acquainted with Framer:
- Framer Crash Course by Pablo Stanley
- Learning Framer By Creating A Mobile App Prototype by Greg Rog
- The Framer Book by Tes Mat
(This book takes a deep dive into Framer – I’m still working through it).
Making The Framer Prototype
Online tutorials are great, but nothing compares to the thrill (and pain) of creating your own interactive prototype. There were so many things to remember. Framer uses nested layers and therefore requires precise layer naming conventions. No spaces, dashes, or funky characters allowed.
This forced me to cleanup my layers in Sketch, which is a good thing. It also meant I had to re-import my Sketch file a few times to get it right. But each time was a good reminder that quality code requires precision.

What I love most about Framer is that designers can see the results of their coding efforts in real time. It has a prototype view right next to the code window, so you’ll know right away if you screw things up. This is a big part of what makes it so forgiving.
Releasing The MVP Into The Wild
Framer also comes with a handy sharing feature that lets you upload finished prototypes to the cloud. Between designing in Sketch and coding in Framer the entire project took a little less than a day to pull together. Check it out here and let me know what you think: Spork Prototype
What sort of prototyping tools do you use? Let me know in the comments.